|
Vents have been used very often for making digital cars look more realistic, however many designers are now using them in interfaces and templates. Like all things that can be made in photoshop there are tons of ways to go about creating them. I am going to show you a method I sometimes use. But, I want you to keep in mind that you can use different methods and mix up the order of steps I give you. Hopefully after learning how to make vents my way you can create your own methods and your own style vents. So, lets do this!
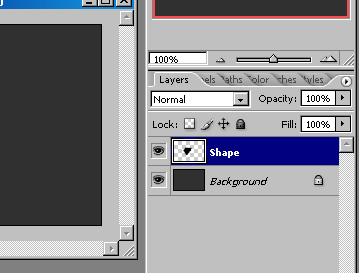
1. Start off by making a 300x200 pixel canvas and set the background layer to a dark grey color. I used #2c2c2c.

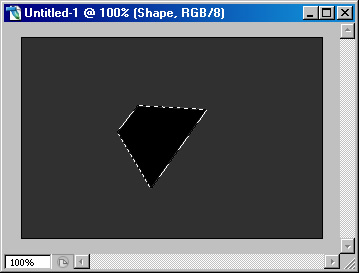
2. Make a new layer and call it "Shape". Grab your pen tool and draw a shape similar to the one I have shown below. Make sure it is closed.

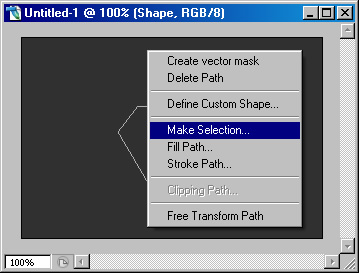
3. With the pen tool still selected, right click anywhere on the canvas and choose "Make Selection" and proceed by clicking ok with the default settings.
4. Press "D" on your keyboard to set the foreground color to black. Press Alt+backspace to fill the selection with black.

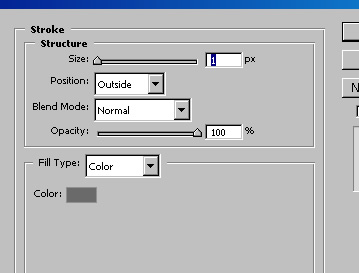
5. Right click on the "Shape" layer and choose "Blending Options". Add a stoke with the settings shown below and click OK. [The color I chose for the stroke was #6b6b6b]
6. Create a new layer under the "Shape" layer and while the "Shape" layer is selected press Ctrl+E to merge the two layers together. We do this to keep the stroke, but remove it as a blending mode. It may be a confusing step for those who aren't familiar with Photoshop, but it is essential.
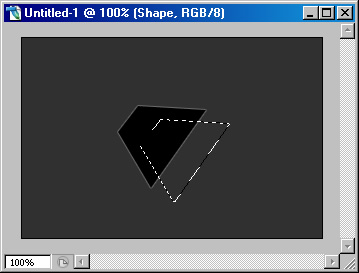
7. Next, hold Ctrl and click on the "Shape" layer's icon/preview box which will select the shape on the canvas.
8. Press "M" to select the Marquee tool and on your keyboard press the direction arrow buttons to nudge the selection to about where I have it shown below.
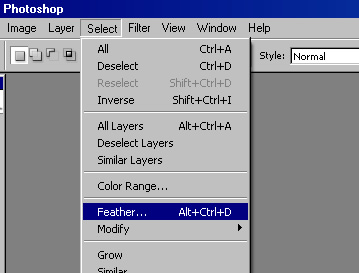
9. Next, click Select>Feather... type in 10 and then click OK.
10. You may have noticed the selection looks different, more rounded. Next on your keyboard press the Delete key several times until you have something like I have shown below. You can also press the directional arrows on your keyboard to move the selection around to delete the parts you want more accurately. This step will take some practice to get what you are looking for.

Press Ctrl+D to deselect it and your all done!
Now keep in mind this is a very simple vent, the edges aren't rounded, and you could add alot of great detail to it. Try going through the tutorial a few times and playing around with different shapes with the pen tool and just have fun with it. There is endless potential with these techniques.
This tutorial is copyrighted and is owned by Tim Silva. You may not reproduce, copy, or use it (or it's pieces) under any other website without my consent to do so.
|
|